Sunday, June 28, 2015

Happy Birthday--MoreFun with Paper Pumpkin and Latch Cards


I really enjoyed the May Paper Pumpkin stamp set, and knew I wasn't done with it when June rolled around.  When I needed a birthday card, it was the first thing I reached for.  Pairing that with the bright colors and fun designs of the new Cherry on Top designer series paper stack was a natural.  If you haven't seen one yet, it's really a must-have for whipping out a quick, cute card for a congratulations, celebration, or any happy occasion.

Here is an easy card using the latch card design, and three different scraps from the Cherry on Top dsp stack.

The rest of the Supplies:
Cardstock:
Cucumber Crush,
Watermelon Wonder
Crushed Curry
Whisper White

Stamp Set:
May 2015 Paper Pumpkin stamp set

Accessories:
Paper Trimmer,
Paper Snips,
Round Punch 1 1/4"
Dimensionals
Paper Scoring tool

Remember, to make a latch card, cut your card stock to 5 1/2 x 7 1/4 and score across the long side at 4 1/4.  After you fold, the shorter side will be the front, and the longer will be the back.  Score 3 lines very close together at 6".  (I usually score one line, then move the card over just 1/16" putting the scored line in between two grooves on my scoring plate, and then score a line on either side of the first one. Do NOT fold or crease those lines; they are just for flexibility.)
In the above picture, the balloons hang over the front to latch the card closed, but they are not taped down on the left side.  Only the right half of the balloons are stuck to the back panel with dimensionals.


As you can see when the card is opened, the side decoration serve double duty to adorn the inside of the card as well as the outside, and the balloons still hang slightly over the back panel. 


Saturday, June 13, 2015

Latch Card Fun Fold for Baby


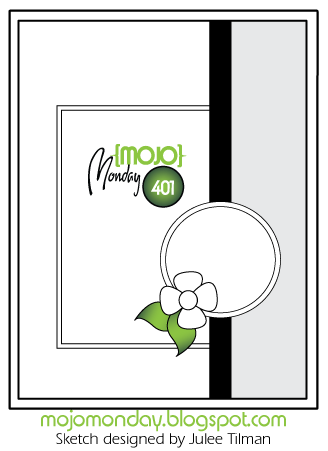
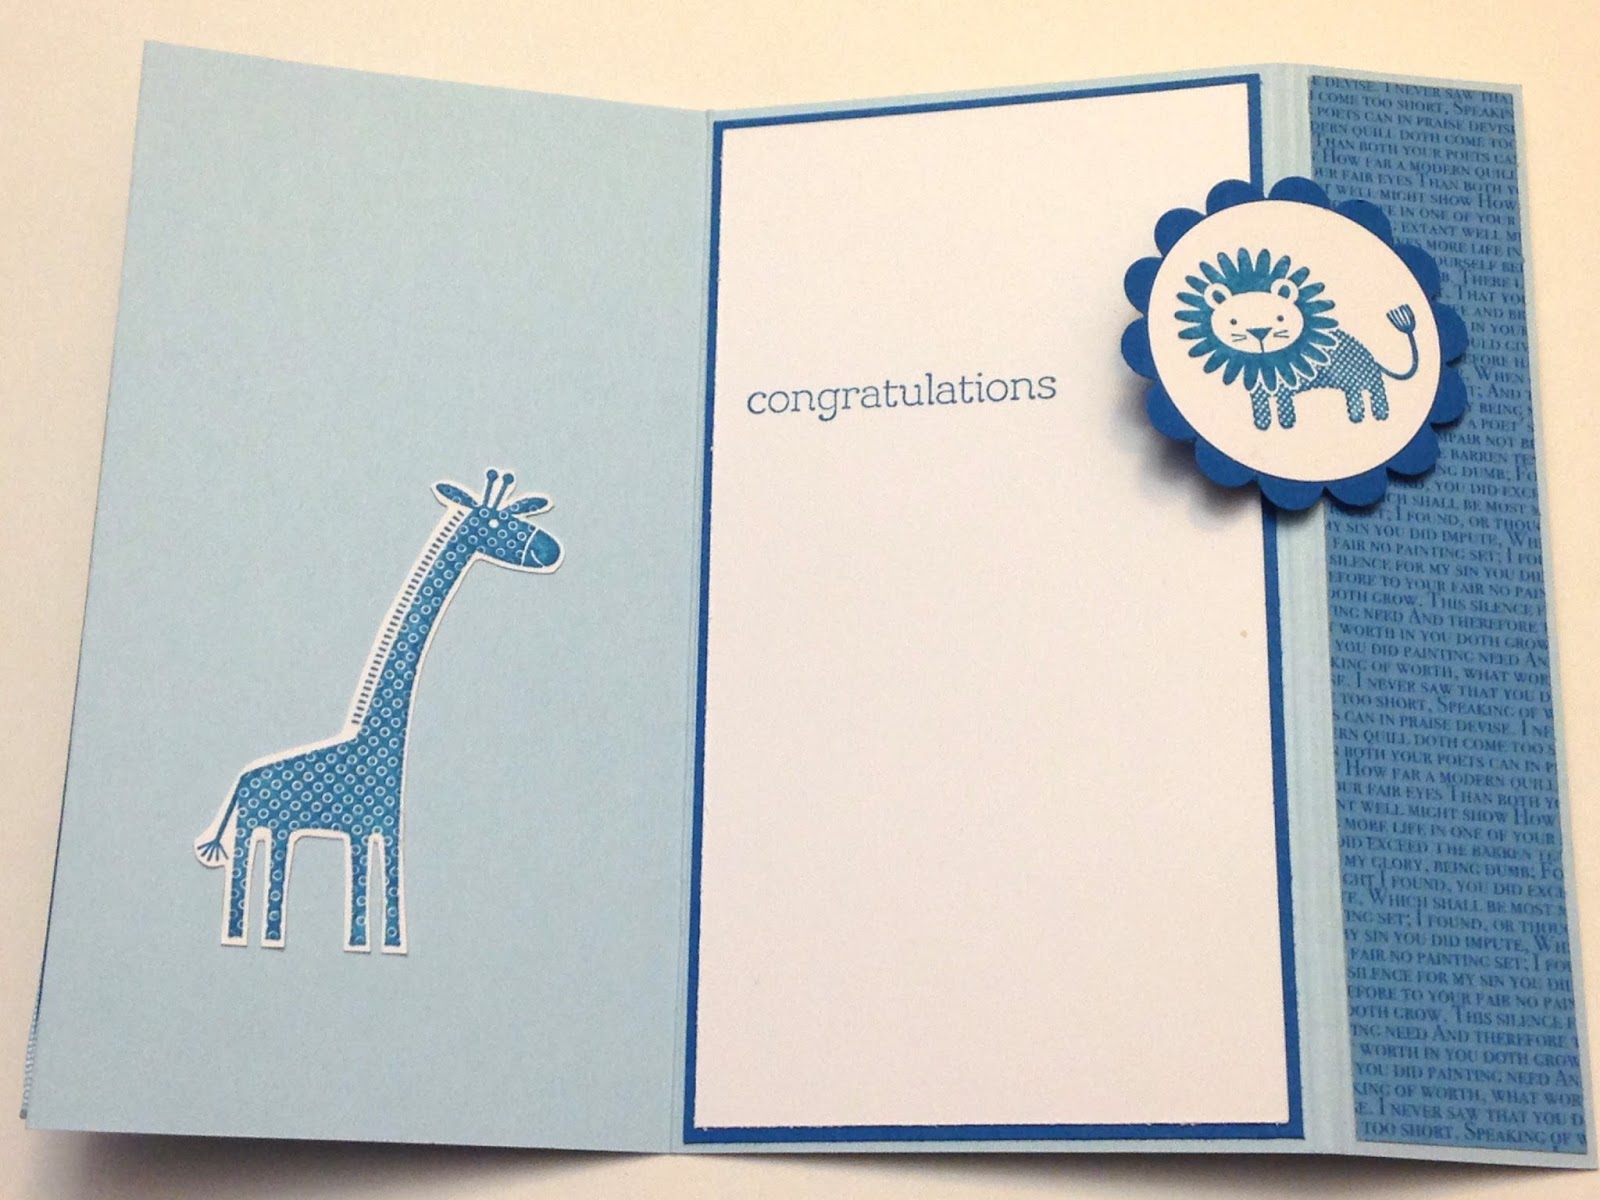
I really enjoy a card that does something other that the usual fold-in-half. When I saw this week's Mojo sketch, I knew it would be perfect for a latch-style card.  This card is super easy to make, and whatever ornament you use for the latch is visible whether the card is open or closed. 

The trick is to take your regular 4 1/4" by 5 1/2" card, and just cut 1 1/4" off the width of the front panel so it ends up 3" wide. You can change this to make your front a little wider or narrower, as you like.

Or, if you want to start from the beginning, cut your card stock to 7 1/4" by 5 1/2", lay landscape-wise on your scoring platform, score at 4 1/4", and fold.  The shorter panel is the front. 

With the card folded, score the back panel right where the front ends. Opening the card, add another score line just to the right and the left of the first one.  Do not fold on these lines; they are just to give some extra flexibility to the card.
 Decorate the front of the card as you like, and make one pop-up decoration to be the latch.  I have used my little lion from Zoo Babies, layered on a 1 1/2" circle and a 1 3/4" scallop circle. 

Use dimensionals on the right side ONLY of your latch ornament, and stick it to the back panel to the right of those score lines on the back. 

Now you will be able to gently bend back that outside bit of the back in order to move that latch out of the way, and allow the card to open and close.


Monday, June 8, 2015

Dahlia Flower Fun Fold

 Whenever I see a paper with beautiful, fine scale, contrasting designs on both sides, I immediately think of the dahlia fold flower, because it uses both sides of the paper equally. This design from the All Abloom DSP Stack especially called out "fold me!" (How to below)

I just love the colors in the this collection--the combination of so many blues, greens and pinks that are darker than pastel, but still calm and soothing. 

I love to stock up on retiring colors, but I'm really bummed that I only got one of the All Abloom. I'm going to enjoy the heck out of it, though, and be very happy for the many more choices I have in the current catalog. 

Here is my list of supplies:  (shop here)
Paper:  All Abloom DSP 4x6 Stack (retired)
Blushing Bride
Lost Lagoon
Pistachio Pudding (or use Mint Macaron)
Embossing folder of your choice (try a fine, small scale floral or pattern like the new Elegant Dots )
Whisper White Baker's Twine

 I used a retired edge border punch, but you could just as easily leave the edge plain, and just cut it a little larger than the Blushing Bride Layer.  I also used a button from my stash.  If you don't have a button you like, try a brad or punch out a center from card stock with a 1/2 circle punch or a flower from your itty-bitty punch pack or itty-bitty accents punch pack, and attach with a glue dot.


Making a dahlia fold is not hard, just a little time consuming if you are making multiple cards.  To begin, choose your designer paper and a circle punch.  The paper needs to have a fine pattern or solid color on each side that contrasts with the other side.  The circle should be half of the diameter that you want your flower to be; so if you want a 2 1/2" flower, use a 1 1/4" punch. 


Punch eight circles from your paper, then follow the steps below.

1.  Fold each circle in a criss-cross, unfold.


2.  Fold the two adjacent quarter curves inward as shown: 


3.  Turn over.  Fold two bottom edges to meet the center line, as shown. It is best to do this step while holding the petal in your hands, rather than flat on the table.


 4.  Do four petals this way, and do four starting with the paper facing with the opposite pattern up.  So, in the case of my black-and-white flower, I would start with four petals as shown, but the other four would start this way: 


              and end up looking like this: 


5.  The best way to put your flower together is by using a glue stick.  Punch one extra circle (a little larger than your petals to make it easier) and cover it with paste from your glue stick.  Put a little paste on the back of the pointy half of each petal, and arrange them together.


 I like arranging them with one color always on the outside, and the other in, but they can also be arranged spiral wise, like this:


Either way, the glue stick takes a little while to dry, so you will have time to tug on the petals a little, to get them all nice and even.  

 Add the button, brad, or other embellishment of your choice to the center, and you've got your dahlia!  I also matted this one on a layer of card stock which I fussy cut scallop-wise around the flower, and another which is just a plain circle. 

Variations:  Try using just three petals to form a bud, or four to five to show a flower from the side.  Try using eight identical petals, or arranging the petals in a vine.  Have fun!


Friday, June 5, 2015

Smooth Sailing

I bought a refill of a Paper Pumpkin kit called "Pinwheel Party," to make these cute sailboat cards.  (Refills of past kits are available for purchase to Paper Pumpkin subscribers. To try a kit, click here) 

I was thinking about variations to make on this card, like adding a little sponging to bring out the layers of waves, or doing a daytime/nighttime card, when Mojo Monday came out with a really great, very simple sketch for their 400th weekly Mojo sketch challenge.  By the way, Julee, if you're reading this, 
https://blogger.googleusercontent.com/img/b/R29vZ2xl/AVvXsEjmEZNwNwfUEgqArjKBcmM718FnkscuErG3dDKnqsQ9GuWLAtSBLalzzokW317kewtYaZ3mijD-IG_flAIP76pI8SZLAAf4k3W9c4Bu6Qs42jsAsoBHXKWP04xMupyjl8Lxcn4t7shvgq-d/s1600/MM400DesignerBadge.gif

I already played this week's challenge, but I find that often the simplest assignments lead to the biggest explosion of creative juices.  It's so easy to come up with a with ideas for this sketch--I think I'm going to return to it frequently in the future.

It was perfect for my day/night sailboat card with the sponged waves.  It may be a little hard to see here, but I also used a paint brush and white pigment ink and a very little Night of Navy ink to add a little bit of cloud mist. I used little scraps of Irresistibly Yours DSP for the sails, and a 4-1/16 x 5-5/16 piece for the starry panel.  It is sponged in Night of Navy.  The sail is sponged in Daffodil Delight and Real Red.  The daytime sky is Soft Sky, and the water is Marina Mist with Night of Navy sponging, and just a little white pigment ink on the lowest wave to highlight the crest. The sailboat is Calypso Coral. 

This card took a bit of paper-piecing and fussy cutting.  The ball of the sun, the circle cut-out for the daytime scene and the ball at the end of the mast are all punched.  The waves were cut with a Colluzle knife and template. Everything else was fussy-cut free hand.  The banner was drawn and written freehand as well.

It is hard to see in this photo, but the daytime circle is actually flat to the card base, and the night sky panel is popped up on dimensionals.  The waves are sponged the way the ocean looks:  darker towards the horizon, lighter towards the shore.  The banner is further popped up, adding to the card's depth.

Some of the best times of my life as a kid were spent on a little lake at Varsity Day Camp in Pinkney, Michigan, sailing little sunfishes back and forth across calm water. Swimming, archery, and of course, arts and crafts were all on the agenda.  The Wisniewski family made a lot of kids very happy, year after year.  Here's to you, Mr. & Mrs. Wiz!


Julee--are you still reading?  Pick Me!


Wednesday, June 3, 2015

Something Old, Something New


What is is about June that makes it so perfect for weddings?  This week's Monday Mojo sketch had me running to my lacy wedding stuff:  something old is the Something Lacy background stamp which, sadly, is retired now, but still so pretty.  Something new is the new Mint Macaron 1" Dotted Lace Trim 138424,  which I believe has quickly become my favorite of the new in-color ribbons.  I also used new and old colors of the Stampin' Write markers.  Here is my card from this week's extra special sketch:


http://mojomonday.com/Files/MM400DesignerBadge.gifWhat do you think?  Monday Mojo is looking for two new designers.  I would love to be on the Mojo team.  Leave me a comment if you would like sketching with me!


https://blogger.googleusercontent.com/img/b/R29vZ2xl/AVvXsEhoz3HAeMZnmQXbmQ24AnB3QF9L0RHNj6mhDAAkPQFPfOn9sTfSoU6My4V-ews2Rb96W-pA3IvVLBa_6oDdQKJaO0Q1JaK2wuaKwDG49tl00MXpIyOQ0RfA_baaYDqucwnzoeFpUxQM6zGF/s1600/Mojo400Sketch.gif
                  (The sketch)


http://www.stampinup.com/ECWeb/ProductDetails.aspx?productID=138444&dbwsdemoid=2093167


If you would like to make this card but do not have this or another floral/lacy background stamp, try a soft Designer Paper such as the beautiful new
Timeless Elegance Designer Series Paper 138444 
The Sahara Sand color looks great with the Blushing Bride and the Mint Macaron. 


Supplies:  

Card Stock:                                                      Stamp Set:
Blushing Bride 131198                                      For the New Two 137147 (wood,) 138562 (clear)
Sahara Sand 121043                                                           
Whisper White 100730                                    Embellishments:
Vellum  101856                                                  Pearl Basic Jewels 119247                                      
                                                                              Mint Macaron 1" Dotted Lace trim 138424
Ink:                                    
Mint Macaron 138326                                       Embossing:
Versamark 102283                                             White Stampin' Emboss Powder 109132
                                                                               Heat Tool 129053
Markers:                                                
Watermelon Wonder, Mint Macaron, Cucumber Crush, Blushing Bride, Old Olive, Pool Party
And don't forget: Sticky Strip,  Snail Tape 104331, Dimensionals 104430 and Tombo 110755,


Monday, June 1, 2015

Happiness, Bohemian Style

  The new Bohemian Borders photopolymer stamp set features several fun border stamps, plus this great trio of interlocking diamond shapes that you can color the way you like.


Card Stock:
  So Saffron,
  Bermuda Bay,
  Very Vanilla
Ink:
  Delighful Dijon,
  So Saffron,
  Bermuda Bay


Stamps:
  Bohemian Borders,
  Guy Greetings,
  So Very Happy 
  Accessories:  Snail Tape


I love the way these diamond look like the god's eyes they taught us to make in elementary school, in art class.  It just brings back memories of choosing colorful yarns, winding them around and around two popsicle sticks arranged cross-wise, until I had a beautiful craft to present to my grandmother after school.  The whole Bohemian DSP and stamp collection seems to be evocative of beautiful, rough woven carpets and tapestries, bright raw-silk scarves, and colorful wool ponchos that speak of warmth and comfort.

Happy Stamping!
Gosia

Curvy Keepsake Wedding Favor

 I really like the new in-color ribbons for 2015-17.  They are wide and lacy, scalloped on one side, and have a really great feel.  They tie a nice fluffy bow, and make a great little fan.


It was when I was playing with a bit of extra and pleating and fanning it, that I came up with this idea for a sweet little wedding party favor. 


The box was made with the Curvy Keepsake Box Thinlits die , out of Something Borrowed DSP . Cut two pieces, PLUS an extra handle loop.  Trim the handle, so that the bottom is straight.

Assemble the box first, as shown in the directions for the die.  CLOSE the box before attaching the fan.  To attach the fan, and yet still allow the box to open, attach the ribbon to the outside of only one of the paper handles: first, put sticky-strip along the upper loop part of the paper handle.  Press one end of your ribbon to the end of the loop.  Make a pleat, and press onto the tape. Make another pleat and press it next to the first.  Repeat until the fan is finished.  Now take the extra loop that you made, and use snail tape or sticky strip to tape it on top of the pleats, to give a nice clean finish.  You will not be able to open this flap, but the other flap of the box will still open. 

Here is how to make the little tag.  I used the Teeny Tiny Wishes stamp that says "For the Newlyweds."  However, I only wanted "Newlyweds," so only inked that part, and covered the "For the" part with scotch tape before stamping to ensure that I would get a clean image. Stamp, then cut with the oval die from the Curvy Keepsakes Box die set. 

I tied the tag on with white baker's twine.  *Be sure to loop the twine ONLY on the front handle loop.  If you thread the twine through both the front and back loop, you will not be able to open the box.

In order to glue on those tiny little hearts (made with the Hearts Border Punch,) use the following steps:
first, put a little blob of Tombo or other white glue onto a scrap of paper.
Using your paper piercing tool, pick up a tiny dab of glue and roll it onto one of your hearts.

 
Next, simply pick up the heart with your paper piercing tool, turn it over so that the sticky side is down, and place on the paper tag.  Put your finger on top of the heart, and pull the paper piercing tool out.  If you have used a tiny enough dab of glue, your fingers should remain clean enough to do the second heart without running to the sink to wash your hands!


 Somehow, I liked a silver bow with this instead of the white, which I expected to like better.  Whichever you like better, attach with a single glue dot to the same side on which you attached the fan.  The other side must remain clear of embellishments so that the box can be opened without tearing.

Happy Stamping!