Thursday, May 14, 2015

Paper Pumpkin Sale!

Only until June 10th, Stampin' Up! is offering a great deal on your first two months of Paper Pumpkin.

You can get 50% off your first two months by using the promotion code  SAVE50  when you order.  The code must be redeemed off of a monthly (not prepaid) subscription.  After you get your first two months, you may continue to receive Paper Pumpkin at the regular price, switch to a pre-paid subscription for further savings, or choose to stop receiving those cute red boxes in the mail.

To order, click here:  Paper Pumpkin  and don't forget to use your promo code  SAVE50

To see a Paper Pumpkin demonstration, try this video

Gift Bag Punch Board--alternate projects

The new 2015-16 Stampin' Up! catalog is out!  The new in colors are here (very nice again--good job color team!) and I am using a whole lot of exclamation points.  You can order from the new catalog starting June 2nd.

   A great new toy in the new catalog is the Gift Bag Punch Board.  I can't show you a picture of the actual board until June 2, but here is what you can make with it:


On the left, a cute little gift bag 3-3/4"x2"x6", and three little boxes, 2"x2x"1-3/4"
On the right, a pentagon shaped box, 2-3/4" high (not counting the pom-pom) and 2" on each side, and another of the little 2"x2"x1-3/4" boxes, just perfect for filling with candy or jewelry.

(How to coming soon--or sign up for my June 1st class to get to try it for yourself!)

The designer paper for the bag is Painted Blooms DSP, which is retiring.  This is a gorgeous set, so be sure and get it while it lasts!  Last day to order will be June 2nd.  The boxes on the left are made with the new Neutral Designer Color Stacks.  I just love the new patterns--they're so cute.  Three of the patterns are there; the fourth is polka-dots, a bit bolder than the last color stack design.  The box tops are one of the new in colors, Watermelon Wonder.  It's really pretty--a bit redder than strawberry slush.  The ribbon on the black box is the new dotted scalloped ribbon.  Very lacy and nice and wide.

The papers on the right are all from the Gingham Garden DSP, which retired last year.  I stocked up.  Did you?  Always check the retiring products and clearance rack for all those items to which you're not quite ready to bid farewell!  They are sometimes available at a discount, and make great shopping at midnight when you can't sleep.


Tuesday, May 12, 2015

Happy Father's Day

https://blogger.googleusercontent.com/img/b/R29vZ2xl/AVvXsEh4cQYw68YgQ1DmxDuHpycsbVWTJLtoamsV7Xep-kiQSveZx4DF3vs5VVHmmt1mSd1Q43B6715gomhg2QwJCP01Z1Ts9O7gz8q8EunH4lofeiMlVTAItVQstvM32horU7OdFnw4t_cEWuZ2/s1600/Mojo397.gif


My Monday Mojo project--and done on Monday, even!  (Ok, I didn't get it posted til after midnight, but still.) 

I am really happy with this card.  Not only did it turn out well, I forced myself to do it in one take, without futzing.  My only false start was in cutting out a piece of DSP for the vertical panel that I decided against using in the end. 

Have you checked out the "Guy Greetings" stamp set?  It is awesome!  Total ammo for any masculine card you'll ever need to make.  There is a stamp for almost any male relative, several cute sentiments, and lots of pictures.  I'm going to get years of use out of this one.  The image below will take you to the store, where you can see a larger image and an cute example of a gift-box using this set.
 online store
Supplies: 
stamp set:  Guy Greetings
ink:  Early Espresso
card stock:  Lost Lagoon, Early Espresso, Very Vanilla
DSP: Neutrals Color Stack, Soft Suede
accessories:  Chevron Punch, 2 1/2", 1 1/4", 3/4" Circle Punches, Sponges, Dimensionals, Paper Snip scissors.

The blue circle behind the hat was originally punched to 1", but I wanted the frame narrower, so I fussy cut the circle to about 7/8".  A friend gave me the great tip of using a nail file or emory board to smooth out a fussy cut.  I worked really well--that circle looks like it was punched, doesn't it?

Card Making Frenzy


Here are a few cards I designed for my classes and make-and-takes. 
All supplies are available in my online store.


The Work of Art stamp set is totally fun, no-worry, no-fuss, can't-make-a-mistake kind of set.  I only used four colors here, but it looks like more since I double stamped the Tempting Turquoise swath to get two different shades, and did the same with the Melon Mambo hearts.  Just ink up your stamp, and make TWO images without re-inking in-between.

Supplies:
stamp set:  Work of Art
card stock:  Tempting Turquoise, Basic Black, Whisper White
ink:  Tempting Turquoise, Melon Mambo, Pistachio Pudding, Daffodil Delight


A great, all-purpose card.  Add the sentiment of your choice to make it for a birthday, a wedding, or a thinking of you.

stamp set:  Butterfly Basics (a must-have!)
card stock: Blushing Bride, Crumb Cake, Very           Vanilla
DSP:  Something Borrowed
ink:  Black Stazon
markers:  Blushing Bride, Old Olive, Pear Pizzazz
embellishments: Antique Brads, Blushing Bride cotton ribbon

The ribbon I used is from years ago, but there is a new Blushing Bride 1/4' cotton ribbon in town!  I actually like the new one better, because it does not have the white edge.  I think it's prettier that way.


Quick!  Before they go away--the Four Frames stamp set is really cute.
The "Mom" is already gone, but There are plenty of cute stamps that will fit in the scalloped oval.  The "Crazy About You" set has plenty, as well as "Teeny Tiny Wishes," and many others. 

The Polka-dots embossing folder is another must-have that's going away.
Get them fast!

Supplies:
stamp set:  Four Frames (retiring!) Loved Ones (retired)
card stock: Lost Lagoon, Blushing Bride, Whisper White
DSP:  Flower Pot
Accessories:  Blushing Bride 1/4" cotton ribbon, Polka-dots embossing folder (retiring!) 

Sunday, May 3, 2015

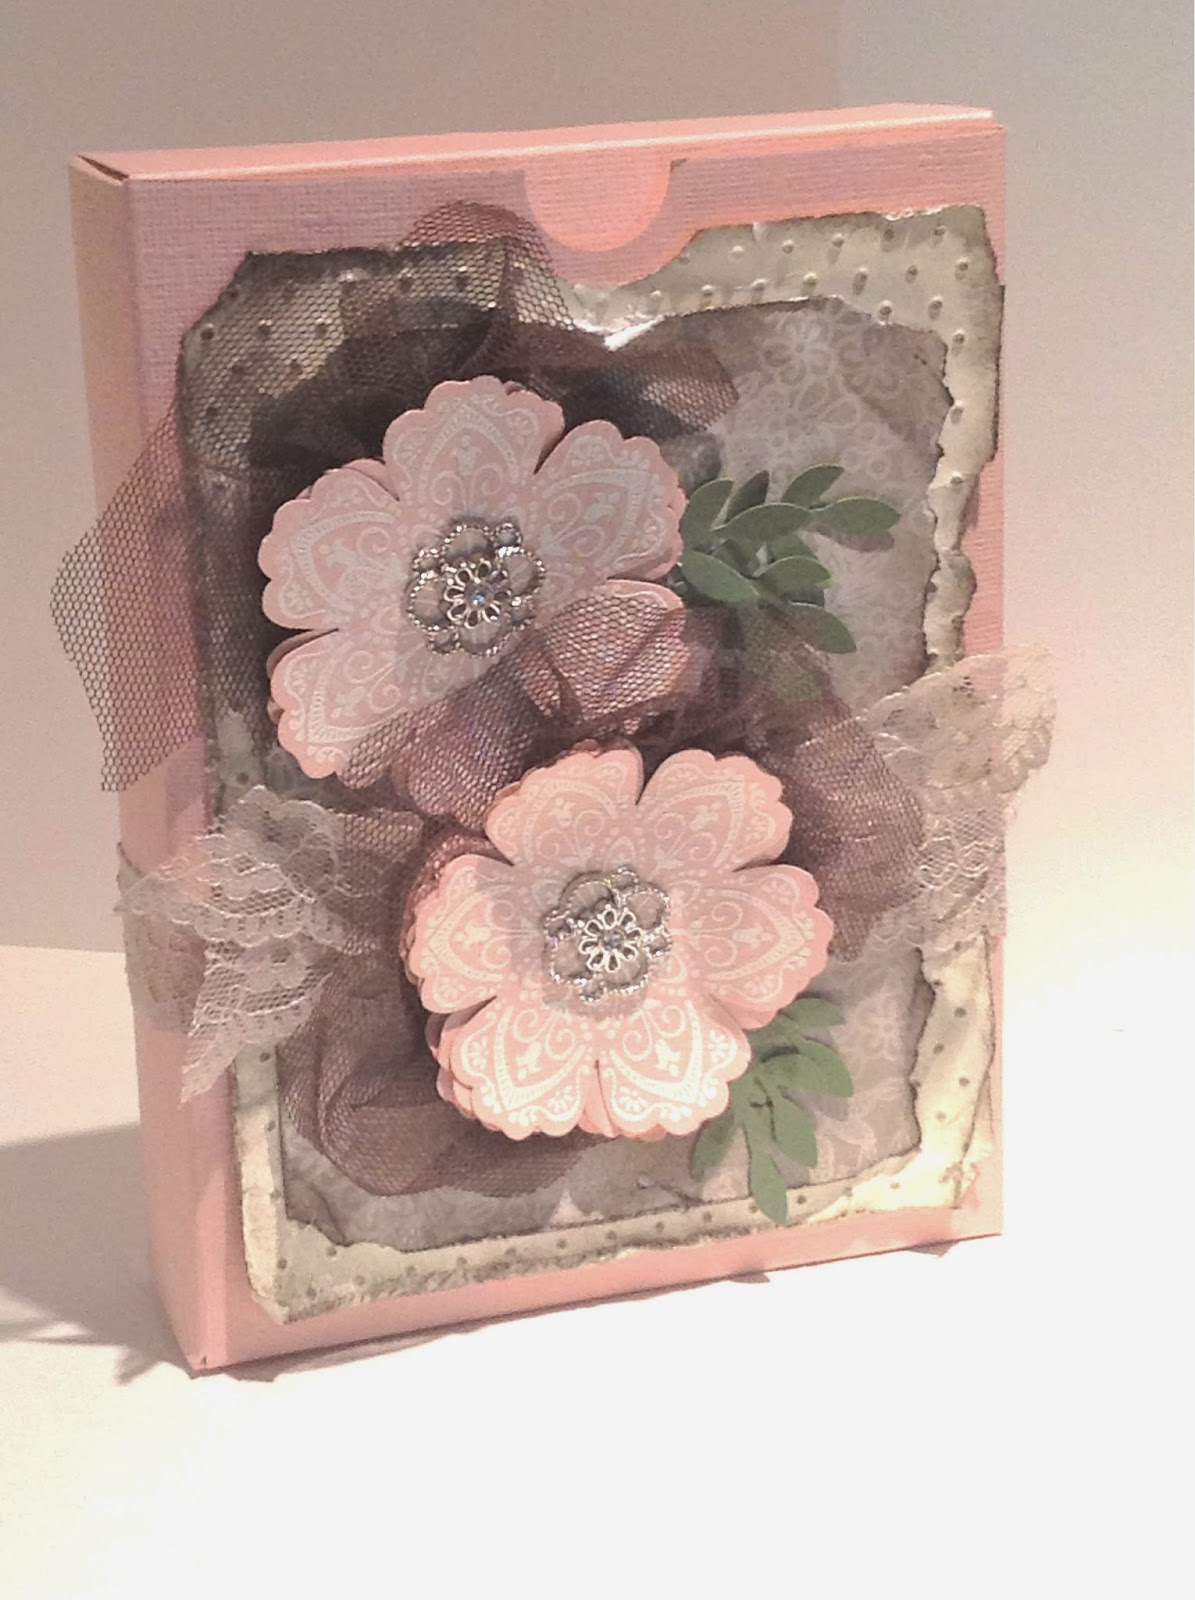
Shabby Chic Gift Box


I love making this gift box.  It's so easy, and fun to decorate.  It will hold 4 or 5 lumpy, or 6 or 7 flat cards with the envelopes, and makes a great gift for those who love to send pretty cards, but don't make them, themselves.

Instructions on how to make the box here.

I used
12 x 12 card stock, Blushing Bride
4 x 5 1/2 card stock, Very Vanilla
3 3/4" x 5 1/4 Something Borrowed DSP
a little bit of Always Artichoke
Early Espresso Ink and Stampin' Sponges 
Mixed Bunch Stamp Set,
Versamark, White Embossing Powder, & heat tool,
Blossom Punch, Bird Builder Punch  
7/8" Sahara Sand Lace Trim, 
Early Espresso Scalloped Tulle Ribbon, 
Polka-Dot Embossing Folder and my Big Shot
Two buttons or brads (I recommend Antique Brads)

 The trickiest part was choosing adhesives to get the various surfaces to stick.  Here's what I used:

Layers of paper flowers to each-other:  normally, I would use snail tape or glue dots.  However, because I used split paper* to make the flower layers, I used a glue stick between the layers.  A better choice, I think, would be to use a brad, but I didn't.  Maybe next time.

Tulle to paper:  Snail tape.  Run snail onto the tulle, press one end to flower, then bunch small bits of the tulle and stick them to the flower one bit at a time.

Flower with tulle to box:  if your bottom layer of flower is smooth side down, use sticky strip for extra strength.  If the bottom is fuzzy, you won't be able to uncover the sticky strip without ripping it from the paper.  SO, here's where the brad helps.  Just add an extra scrap hidden at the bottom of the flower.  Otherwise, you'll have to use my almost fail method:  put a little Tombo (white glue) on the flower and onto the box.  Dry both with a heat tool until they are tacky.  Stick 'em together, and voila! Cement.  


Lace trim to box, Paper layers to box:  snail tape.  To get that raggedy look, don't put the snail all the way to the edge of the papers.  
Leaves to paper:  glue stick, leaving the top few leaves loose.


*Splitting your paper:  I punched out two flowers to emboss, and two to layer underneath.  I crunched up the plain ones, and when the paper began to split, peeled the layers, making four plain flowers. I used one to give the top flower a bit of loft, and three underneath the bottom flower. Using split paper gives you pretty layers without quite as much bulk. Split paper is very fuzzy on one side, so it's hard to get snail tape or glut dots to stick to it. You certainly don't have to split the layers for this project; I find it's useful when making cards to mail. 


Card Box Instructions


Card Box Instructions

By Gosia Hoot, Independent Stampin’ Up! demonstrator


1.     Score 12 x 12 card stock as shown.   Cut along BOLD lines.
2.     Fold along all score lines; flatten.
3.     Round corners of three top flaps. 
4.     Place two-sided tape strips along all ORANGE lines.  Do not uncover tape yet.
5.     Fold box mountain-wise along all vertical lines, so that the tape will line up.
   Uncover tape on vertical tab * only; tape to opposite side *, making box.  Tab
   should be on the inside of the box.  If your tape is on the wrong side, just fold the
   box around the other way. 
6.     Fold in two small bottom tabs (labeled “fold first,”) uncover tape strips.
   Fold in wide bottom tab labeled “fold second.”  (Do not uncover tape strip yet.)
   Press firmly to short tabs.  This is best done by using a stamp box or the side of a
   paperback book from inside the box.
7.     Place the box on the table so that the last tab (with the GREEN line) is on the table.
  Place two-sided tape along the edge of the last tab, on the side facing up (towards
  the box.) Uncover the tape on both long tabs; press last tab firmly to bottom of box.
  8.   Use a 1” circle punch to cut a semi-circle in the center of the box top the side
           without the flap.
   9.  Decorate! 

Tuesday, April 28, 2015

Happy Mother's Day!

(Details, Details!, My Favorite Mistakes and Monday Mojo, all rolled into one)

 Don't you love it when you can kill two birds with one stone?  I am combining several challenges AND a "Details" demonstration in one card here.  And a "Favorite Mistakes," too.  It makes me feel so efficient.

Monday Mojo #395--A really cute sketch this week.  (Do I say that every time I do one of these?) Even though I chose not to do the tall & skinny, I did enjoy this sketch, although I could immediately see that the little flag at the bottom right and I were not going to strike up an immediate friendship.  However, I did end up working it in, and like the result.  (Supplies list below.)


https://blogger.googleusercontent.com/img/b/R29vZ2xl/AVvXsEg78vsG2_mFBRAAX-6QF5lrdtGUG04Fos2ESMIehgPwTJpSHi0QGU53wXnNDShkGm8uwx3T-Cmrioauqm4MTWAf7488antmzzoY99LkFeAWzaXpNWCgTODYwq614Klfr2wZvdSo3pTQBtSJ/s1600/zzMojo395.gif
click here to play along


I knew I wanted to start with some spring flowers, and the little tulips from the Painted Blooms DSP were exactly what I wanted.  This is such a great paper set! The florals are backed by loose stripes, fun polka dots, or washed-solids.  Every time I look at it, I think what a fun wrapping paper it would make.

Painted Blooms DSP


As I worked on my card, I managed to slip with my punch and hang one of the scallops off the edge of the paper, resulting in a flat instead of a curve there at the top.  Lucky for me, I know several ways to deal with this, instead of balling up the punch-out and starting over (which is of course an acceptable solution, but I do like finding ways to fix all those little mess-ups, I do.)

The first way is to hang the flat scallop over the edge of the card, making it look like it was trimmed there on purpose. 


Here is the same idea, but the scallop was hung over the inner layer of DSP, leaving the card stock edge uncovered:


However, I wanted to place the scalloped circle more towards the center of the card; so I looked for a tulip of the appropriate color somewhere along the arc of where I wanted my edge to be, and simply used the flower to camouflage the missing bit of paper:


Pretty cool, huh?  You can't even see it from a normal distance.


So then I added my stamped greeting from the "Hello There" hostess set, which will be retiring at the end of May, 2015. 


This is a nice little layout, but I felt like adding a little more detail; so I layered the floral strip onto a piece of Soft Sky paper, which is the same as the card base.


I really liked it, but I did want it to be specifically a mother's day card, so I was able to incorporate the little flag after all:

This, of course, brings us to the final way to deal with that little scallop-shaving mistake.  Cover it up.  The most frequently used method to deal with card making, and also (so I hear,) political errors.
Happy Stamping!

Hello There Clear-Mount Stamp Set
Hello There stamp set--retiring soon

Supplies List--Purchase Here

Card Stock:
    Soft Sky, Marina Mist, Rose Red, Whisper White
Designer Paper:
    Painted Blooms
    In Colors 2014-16 Paper Stack (Hello Honey)
Ink:
    Blackberry Bliss, Marina Mist
Stamps:
  Hello There (hostess set, retiring soon!)            
    Teeny Tiny Wishes
Blackberry Bliss 3/8" Satin Stitched Ribbon by Stampin' Up!
Gorgeous Ribbon--ON SALE, retiring soon!
Punches:
    2" circle punch
    2 3/8" scallop circle punch
Accessories:
    Blackberry Bliss 3/8" satin stitched ribbon
    Glue Dots, Dimensionals, Snail Tape