Friday, February 20, 2015

Butterfly Mania!

What is better in springtime than butterflies and blossoms?

Maybe the addition of the fun Irresistibly Yours Designer Paper--available as a free Sale-a-Bration gift with a purchase of $50. 

The paper is white, and embossed with six different patterns--stripes, dots, stars, etc.  You can use it plain for a very subtle look, or sponge with color for a variety of effects.  I used the little flower pattern here. 

Start with a slice of the Irresistible flower paper 5 x 3 3/4".  Stamp the fern from Butterfly Basics multiple times with Wild Wasabi ink onto the bottom half of the card.  (You can choose from three types of stamp sets-wood, clear-mount or polymer, and also get a discount by bundling it with the Butterfly Thinlits.  I chose the polymer bundle, 'cause I do love to pay less for the same thing!  When ordering, be sure to enter only the number for the bundle, and not the two items seperately, in order to get the discount.)

Then, with a Stampin' Sponge, carefully clean off the excess ink by rubbing in a downward motion, swirling along the bottom half of the card to get the effect of a meadow.

Next, sponge Soft Sky ink onto the top half. 

Stamp your sentiment (from Sale-a-Bration Simply Wonderful stamp set) on Whisper White card stock and punch out with the Extra-Large Oval punch.  The tag underneath is done with a Modern Label punch, cutting the shape in half to widen it. Stick all three pieces together and attach to the card with snail tape.

Attach your meadow to a Blushing Bride card base with snail tape. (I actually used Pretty in Pink, but that's retired now.  If you don't have any left, Blushing Bride will look fabulous with the other colors on this card.)

Cut your butterfly out using the medium thinlit with a Silver Foil Sheet.
Use Glue Dots only in the center of your butterfly to stick it too the card, and don't press too hard, because the little lumps will show through the foil.  Fluff the wings up a little to make it flutter!

Wednesday, February 18, 2015

Mojo Monday Challenge #385

It's been a very long time since I did a Mojo Monday (check out their blog here,--I am entry # 54) but I do enjoy the sketches and seeing the myriad variations that people come up with.


https://blogger.googleusercontent.com/img/b/R29vZ2xl/AVvXsEgX5brvEniTpdQDo7uQ5Om5Un5npbURzyOGqZgdvGPXjoYGihLXT-95HJgDz-RTaugUHVDHFjkCvJw5tsdwWTg8av1SUtPMrKlfzgxz7leEexwqY2rIxczUGqz7-TSGEeXqwKRd9-LFdM6m/s1600/zzmojo385.gif
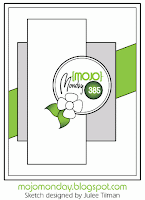
Here is this week's sketch.  The challenge is simply to make a card that resembles this.  You can turn or flip the sketch, change proportions, add or subtract, substitute a butterfly for that flower thing, etc.

I had quite a lot of fun with this card.  I had been wanting to use the birdie from my new "A Happy Thing" stamp set (a fabulous Sale-a-Bration gift, free with your purchase of $50.)

Here is my take on it: 
There were quite a lot of steps in making this card, but none were difficult, and all were fun.


The card base was Bermuda Bay, to bring out the Coastal Cabana Blendabilities marker I used in the bird (along with Cherry Cobbler, two shades of Daffodil Delight, Basic Black, Basic Gray, and Nude.)

I cut a piece of Baked Brown Sugar card stock for the background layer, and then decided it needed some texture. I went through all of my embossing folders in my mind, and chose this fun method for texturing instead: 

Step one, crunch thoroughly,
Step two, crunch some more,
Step three, fray one corner and carefully peel apart the layers.

This last step really is optional; I did it to reduce the bulk of the paper.  When you peel, you will reveal a very velvety texture on the inside of the paper.  I used the outside, and to highlight the wrinkles, I sponged VERY lightly with Chocolate Chip Ink. 

BY the way, it is impossible to put snail tape on the back of split card stock, so when taping this down, put your snail tape on the Burmuda Bay card base, (leaving a little margin around the edge!) and press the Baked Brown Sugar on top of that.


To do the ring upon which birdie is perched, use your 2" and 2 1/2 inch circle punches on Baked Brown card stock.  It is easiest if you punch the smaller circle first (discard the center,) and then make the larger circle around it.

I sponged the ring with Chocolate Chip, Blackberry Bliss and Pear Pizzazz to give it almost a metallic texture.

To get birdie onto his perch, after fussy cutting the whole figure, I just notched around his little feet. 

I chose the 1 1/4" Burlap Ribbon for my diagonal stripe.  To give it a little more interest, I sponged it with the Blackberry Bliss Ink.  It colored quite nicely.

Because the ribbon is rather bulky, I decided to pop up the other papers with dimensionals, using snail tape where they intersected the ribbon.

In order to pop up DSPs, which are thinner, it is best to layer them onto card stock.  With a flash of insight, I decided to use that delicious Blackberry Bliss for this purpose.


The leafy stripe is from Painted Blooms DSP.
However, I found the effect to be too busy for my little bird, so I sponged over the paper with Pear Pizzazz Ink.  Here is the before and after:

After sponging, I layered the DSP over Blackberry Bliss card stock, leaving an inch or more margin on one side.  I laid the bird perch down, and traced the outside of the circle with a pencil. Then, leaving a border above and below the circle, I cut it out, cutting slightly inside the pencil lines.


Here is the final result--------------------------------------------------------------->
(By the way, when I finally put it all together, I snail taped the perch and the bird's tail, but popped up the upper part of the bird with dimensionals.)


The yellow DSP is Birthday Bash DSP. This is a super fun paper set with two sparkly foil designs amongst the sheets. I originally wanted a square about 3 5/8" on a side, but when I layered it with the Blackberry Bliss, I found it a little too wide. This is a very easy mistake to fix. Because there is another layer completely hiding the square top to bottom, you can just slice it down the middle, and either widen or contract the square. The seam will be hidden by the top layer.   

The "Love Life" sentiment is part of the "A Happy Thing" set, and was stamped with Blackberry Bliss on Very Vanilla card stock, cut out and taped down with snail tape.  


Monday, February 16, 2015

White on White Wedding, Easter Cards


Two lovely white-on-white cards, very slightly modified from one I saw on Split Coast Stampers by Laura Borchert.  These cards are very elegant, and super easy to make.


I used Whisper White paper, although for an antique or softer look, you may certainly try Very Vanilla.

I also put my embossed background facing upward, but Laura chose to place it with the ridges facing down, to make the surface smoother.  Both are very nice--one way looks quilted, the other like lace.  One additional upside of putting the ridges facing downward, is that the background is then slightly raised off of the card base.  If you choose to do the same, please use extra snail tape on the back, because only the little ridges will actually be contacting the card base, and it will not adhere as well.


Supplies:  (shop here)
Whisper White or Very Vanilla Card Stock
Oval Thinlitz
Fancy Fans Embossing Folder
Big Shot / Sizzix embosser
Bird Builder Punch
Pearls
Snail Tape
Glue Stick
Dimensionals
Optional Glue Dots
Versamark
Silver Embossing Powder
Sentiment of your choice
      I used two retired stamp sets:
      Crosses of Hope for my Easter card
      Occasional Quotes for the wedding card


How To:
1.  Cut your card base 5 1/2" x 8 1/2", fold in half to 5 1/2" by 4 1/4"
2.  Cut two liners 5 1/4" x 4"  ( I actually added 1/16" to both dimensions on the outside liner.)
3.  Cut the oval out of one liner using your Sizzix with the oval thinlit.  Set aside the oval center.
4.  Emboss the liner using the fancy fans folder.
5.  Time to heat emboss! Lay the embossed liner over the card base, and lightly trace with a pencil, to indicate where the oval will be.  Lay aside the liner, and stamp your sentiment or cross on the card base with versamark.  Heat emboss with silver embossing powder.  (You can do this at the end, but you will have a bit of a bother trying to get the embossing powder out of all the card details.) Erase the pencil marks.
6.  Tape the liner to the card base with snail tape.  If you put the ridges facing downward, please use extra snail tape to make sure the liner adheres properly.
7.  Punch a bird out of the left-over oval with your bird builder punch.  Punch a few extra leaves from a scrap--you don't need the full stems. If you are doing the wedding card, punch a second bird. 
8.   Using the glue stick, arrange the leaves and paste them to the back of the bird.  Use snail tape or glue dots to attach the wing.  Once you have the bird and leaves assembled, use Dimensionals to pop them up.  I actually cut some tiny pieces from the edge of the dimensionals so that I could pop up individual leaves.  You certainly don't have to pop them all up, but I do like giving them a little support. If you are doing the wedding card, you may want to have one bird taped flat, and the other popped up.
9.   Stamp a sentiment of your choice on the other liner and place inside your card. I always like to line even a white card; the extra layer of card stock adds rigidity to the card, giving it a really nice feel, and makes a subtle frame, giving it a nice look as well.
10.  Don't forget your envelope!  Run the flap through the embosser with the fancy fans folder for an extra-special touch.

Enjoy!