Sunday, October 19, 2014

Crazy-Making


I don't know why, but it is evident to me that card making, whether alone or with friends, causes a type of myopia which is usually only typical in small children who can't find the sweater you asked them to pick up off the floor, or the sneaker that you told them three times is under their bed.

Last Monday, at the Cottage Crafts Make-and-Take, the ladies and I laughed when within 10 minutes, no fewer than three crafters sitting around the table asked loudly for the location of an item which was found right in front of them.  The Stampin' Dimensionals are notorious for hiding in plain sight this way, as are the scissors, ink pads, punches, and...actually, anything and everything.

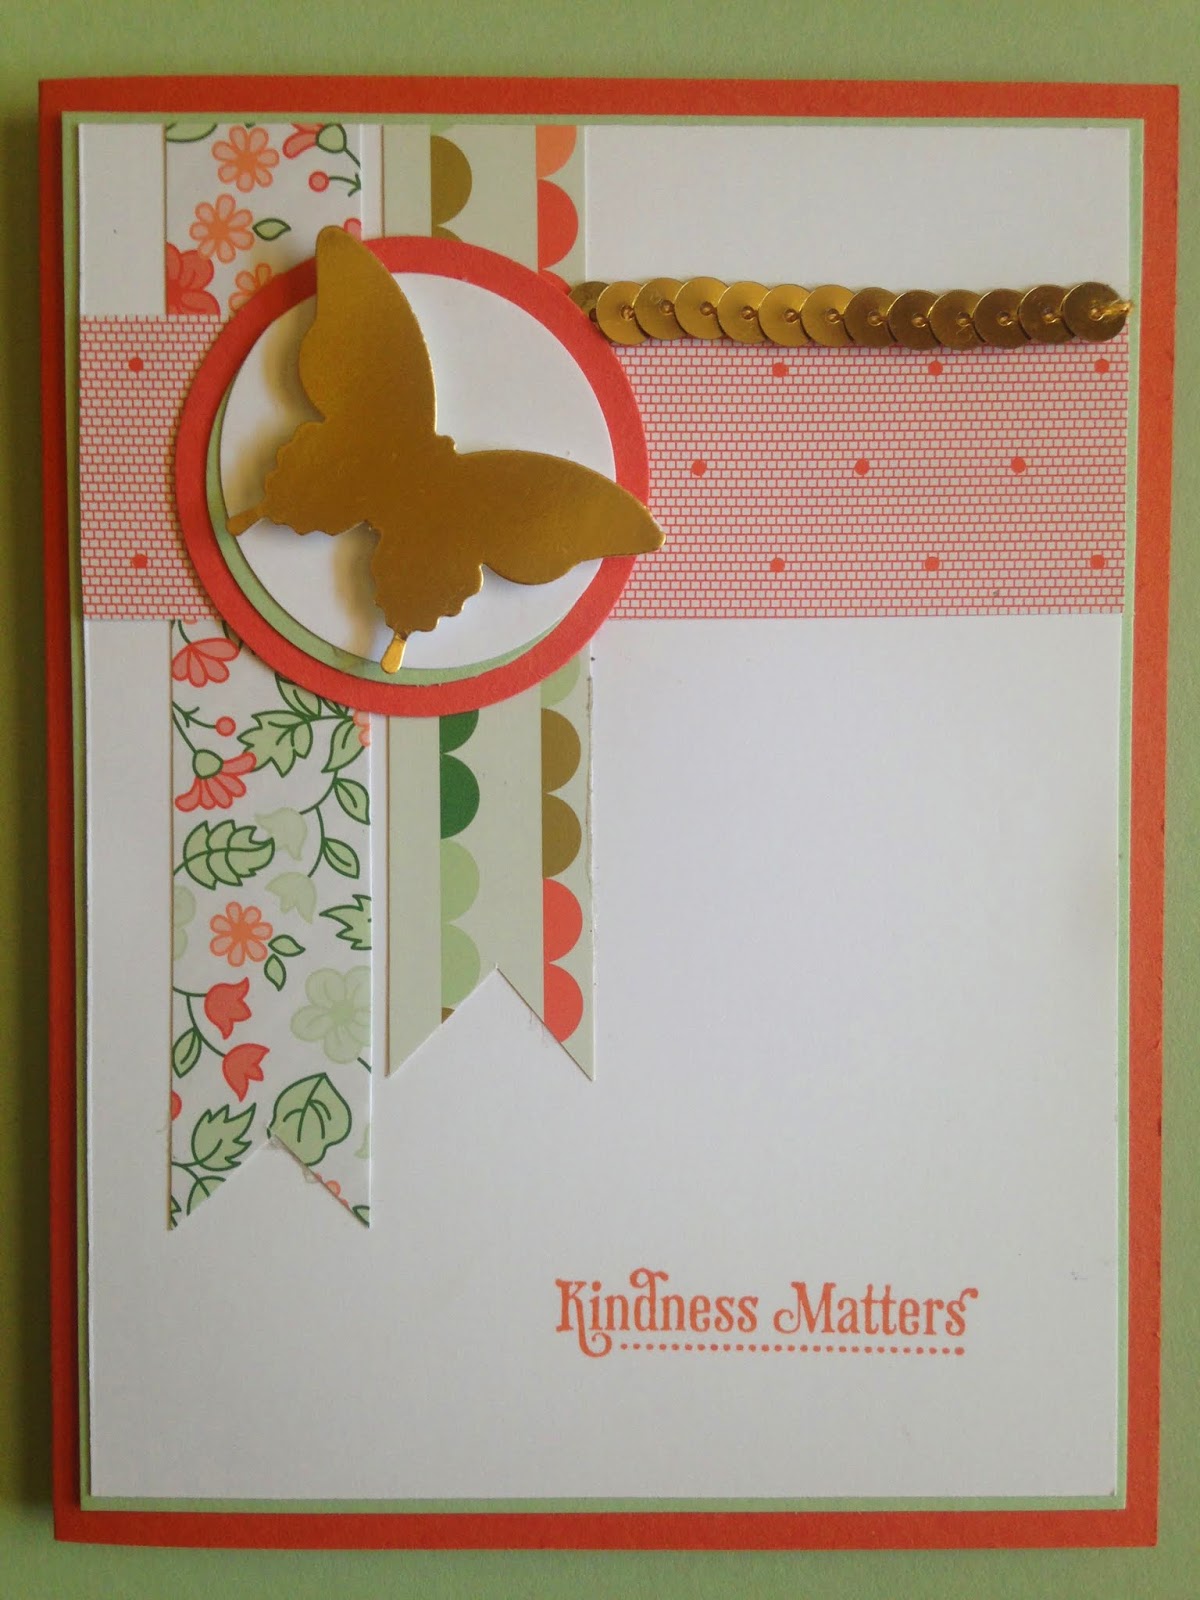
As a matter of fact, a few days prior to this class, as I was sitting at my own table making a few cards, I made the little greeting tags for all of them, and laid them neatly aside on a half-sheet of Whisper White card stock to keep them safe 'til I was ready to use later.  They immediately disappeared from sight, but I didn't notice, because I was working on another part of the card.

When I was ready for the tags, I searched the table in vain to find them.  My little pile of butterflies were just in front of me; my card bases off to the left, and the ink pads (safely closed, see "Learning From My Mistakes") were at the far right.  My mini cutter was at eleven o'clock, my scissors were under a bit of scrap at my elbow, and the snail tape was in my hand.  I put it down, 'cause I was going to use the Dimensionals (right there next to the cutter) for those tags, if I could ever find them.

I decided to get up to get a drink, and from the kitchen, I looked with satisfaction at the mess on the table--the pretty butterfly medallions, the gorgeous spring colors, even tho' it's autumn, the papers that were begging to be made into more projects, a neat row of bright greetings stamped straight and cleanly, the card bases scored perfectly and folded and waiting for the card front, pretty pearls for embellishment, all the fabulous tools that make this so fun and easy...

Back to work!  What was I doing?  Right.  Put card fronts on bases.  Snail tape--excellent.  Butterfly medallion popped up & attached--very nice.  Where are those pesky greetings?  Where, where where?  Back to the kitchen to help someone get something...as I'm approaching the table, I clearly see a pretty row of scalloped ovals lined up amongst all the chaos.  Pretty.  I sit down.  What was I doing next?  Where are those greetings?  I'm looking under and around everything for a little pile of--maybe it's under this sheet of DSP--scalloped--maybe under the mini cutter? ovals with a--wait; were they behind the card bases? greeting stamped on them.

It amazes me still to think how long it took me to see the neat line of exactly what I was looking for right there where I put it so I wouldn't lose it.  And the fact that every time I got up from the table, I saw them; but since at that very moment I was about to do something else, I didn't see them.  Or the fact that since I was looking for a little stack of medallions, I didn't see them laid out in a row.  Right in front of me.

I would say that this is an easy mistake to fix; that the cure is to simply look right in front of you for what you have lost, but you know it doesn't work that way.  You know.  'Cause you've done it too. 

Saturday, October 11, 2014

Inspiration and Perspiration

  Thomas Alva Edison famously said, in 1902, that genius is one percent inspiration and 99 percent perspiration.  When it comes to me and cardmaking, a beautiful card is about 28% searching for a great idea which will lend itself to the (too many--never too many?) supplies I have on hand, 57% adapting said design to what I want to accomplish, 10% making my prototype and saying "huh--that's going to be easy!" 15% cutting all the paper for the 6 or 8 cards I want to make of that design, and 14% realizing that anything you make in bulk always takes hours longer than the kids are willing to wait for dinner.  Which all adds up to 124 percent, which is why you should never sell your handmade cards cheap, or give them to people who will not treasure them forever.

  Last week my wonderful Stampin' Up manager, Brenda, surprised me and the rest of her group with a challenge in the mail.  Inside an envelope, she sent a couple of blank folded Whisper White cards, a few slices of the new Stampin' Up Gold Soiree DSP (Designer Series Paper for those who don't like acronyms) a couple of Gold Foil butterflies and a length of gold sequins.  We were invited to make two cards and send her one to be exchanged in a swap.

  Strangely, although the DSP is very spring-y in color and with the sweet floral print on one side, I took inspiration from a Halloween card that I had from last year for one card; and some scraps of black paper I had laying on my desk for the other.

The card, with it's three strips of DSP, is characteristic of what I often see Brenda do--she is great at joining several little samples of the DSPs on one attractive and harmonious design. 
    However, rather than use the cat card layout, I decided to go with the two thinner strips and a heavier one at right angles.  Left to myself, I would probably have used the new Stampin' Up! 1/8 " gold ribbon for the accent instead of the string of sequins, but I wanted to get into the spirit of the challenge, and work with what I had been given.

  The black & white card is a result of having those little black squares lying around. I could see the gold butterflies on a field of black and white; but as Brenda had provided us only two, and I didn't have any of the gold foil on hand, I though it would be nice to pair a gold butterfly on one field with that same colored butterfly on the opposite field. The fact that my 12-year-old son had been teaching his grandmother to play Texas Hold 'Em probably resulted in the Yin-Yang arrangement which resembles a playing card.  Only a day or two after I completed the card, did I find it funny that I chose the sentiment "friends" for two butterflies that are flitting away from each-other on fields of black and white.  Not sure what a friend would make of such a message.

As I was working on these two cards, I was mindful that I had just signed up for a swap that was due in a day or two.  I decided to use the layout I had come up with for the butterfly card, and make a holiday card to swap.  Here it is:  like it?
The designer series paper, and stamps are  in the current Stampin' Up! Holiday catalog; cardstock and ribbon in the regular catalog.
This card features
To purchase these or any other Stampin' Up! supplies, please click here.
If you would like to schedule a Stampin' Up! party, or if you have any questions, please contact me.
 Happy Stamping!
Gosia

Friday, October 10, 2014

Learning from My Mistakes

    I used to teach ballroom dance, and one very common phenomenon was that when a student made an obvious mistake, they would usually dance brilliantly for about 10 seconds afterwards.  Having stumbled, or missed a beat, they would laugh at themselves, and I would see their whole body relax.  Then, smiling radiantly, they would glide like swans through the next several moves until the spell dissipated, concentration returning to their faces and all their muscles tensing and their breathing tightening. It was quite remarkable.  The mark of a more experienced student was that they could concentrate without allowing the tension that hinders.
    This is my goal in craft-making: to remind myself that a mistake is just about cutting a new piece of paper, or ending up with a card that is landscape instead of portait.  Not a tragedy.  As a matter of fact, the design I end up with might be just as nice or nicer than what I had originally intended.  So just smile, relax, and keep dancing!

Common Mistakes:

Inkblots!
You make a perfect card, only to end up with a thumbprint somewhere very obvious.  Rrrrr!  This is a very frustrating mistake, but there are things we can do.

Prevention:
  •  CLOSE your inkpad!  Never leave an open inkpad lying around on your table.  You will get your cardstock in it, your elbow in it, your hands in it.  Close it every time.  
  • It is too easy to dip your fingertips in your inkpad when inking your stamp.  Watch out for this.  Keep a paper towel on hand to wipe fingers, or just go wash your hands.
Cure:
Cover up.  The inkblot that is already on your card is precisely where a butterfly needs to go.  Or a button, flower, ribbon, banner, etc.
Is it part of the design?  Is it hiding a smudge?  Either way, it looks good!


Smeared Sentiment 
Your beautiful card is all done--after an hour of work, it only needs a "Thinking of You" stamped on before you put it in the envelope and mail it off to your best friend.  You line up your block very carefully, press, rock, press some more, and voila!  No, not voila.  Smear.  But, don't despair!  This is one of the easiest things to fix.

Prevention: 
  • Especially with one-line sentiments, tiny or narrow images, rocking your stamp can cause smearing.  Some stamps need a bit less pressure.  Be sure there is plenty of ink on your stamp, and press straight down and lift straight up. A little practice, or doing a test image, goes a long way.
when doing a banner, stamp first, THEN cut
  • Stamp the sentiment on a piece of scrap paper, cut or punch out, and tape it to the card with snail tape or pop-ups.  That way, you have the opportunity to try, try again without risking your card.

When doing a white card, keep your fingers clean!


  • If you truly want to put the sentiment directly on the paper, stamp FIRST, and then assemble your card.  If the sentiment comes out crooked, just turn the paper over, and try again on the back.


Cure:
re-stamp the sentiment on a piece of scrap card stock.  Cut out with a punch or scissors, and layer it over the smear with snail tape or pop-ups (dimensionals.) Some common punches to use for this are the word window, the modern label, the large oval and scalloped oval.
On this card, did I pop up the sentiment on the corner just to give the landscape more depth, or am I hiding an inky smudge?  I'll never tell.  The middle layer of Christmas-trees-on-a- hill is popped up over the background as well.  (I didn't pop the trees up separately, though you could do that if you liked.)


Wednesday, October 8, 2014

Welcome to My New Blog!

  I am very excited to share some fun crafting ideas with you, especially in the area where I struggle the most, which is design.  Lucky for me, the card-making community loves to be copied!  Where the rest of the world considers plagiarism to be a bad thing, card makers consider being copied to be a compliment, and even have a word: "CASE" (copy and share everything,) to let you know that it really is encouraged. 

  Another place where I love to share is in all the ways I have stumbled upon to ruin my crafts.  Yep, if there's a mistake, I've made it, from the dumbest and simplest to the most frustrating and unbelievable.  If you find yourself looking at your would-have-been-perfect-but-I-just-blew-it project with despair,  hope to let you know that 1) you are not alone, and 2) there may be a way to salvage or even improve, if you are willing to be patient and flexible.  Indeed, many an artist will be amazed to find that the horrible blemish that you struggle with today, someone else will think is really cool, and will be joyfully duplicating it on their projects tomorrow.

  So happy reading, happy crafting, and enjoy!
 
Gosia Hoot

Inspiration and Perspiration

  Years ago, a friend to whom I was bemoaning my lack of design ability, set me free with a single expression for which I am forever grateful.  You see, while I can recognize good design, and render with great skill, I am not an inventor.  I am able to make corrections and improvements on a design presented before me; but to come up with something great, something new, something all mine, seems far beyond me.  Upon hearing this, my friend looked right at me and said simply, "Why be original when you can be good?"  BOOM!!  Freedom.  I can now practice my various arts and crafts, taking great pleasure and leaving the worry behind.  And as I have written previously, the card-making community in particular loves sharing and having their ideas copied, tweaked, re-introduced. 

  With all this in mind, I am now having a lot of fun pushing the "tweak" further and further.  We can take a nice card and move the ribbon over a smidge, or use a button instead of a brad.  We can change the proportions, the colors, the theme, simplify, complicate, reverse, or occasionally, be inspired to create something new which would not have taken place without the original.

  Here is an example of a card which came from TWO sources, both on www.splitcoaststampers.com

   Inspiration #1, by Margaret Raburn                                               Inspiration #2, by Janet Holmes.
So cute, love the colors, and especially
the way the polka-dotted blue reminds
me of a starry night sky.

Love the cut out ghost, layered with vellum to make it look more ethereal.  


Here is the result, using elements of both:

I used my Midnight Muse pattern paper snail-taped to Basic Black cardstock, cut out the moon using two different sized oval framelits, and the ghost using the new Fall Fest bundle.  The pumpkins and stamps are from the same set.  The background is popped up with dimensionals, and the ghost's face is stamped on a white background which is placed on the Tangelo Twist card base.  I snail-taped a scrap of vellum behind the ghost cut-out on the blue/black rectangle. This gives the ghost depth when you see him in person.  The scrap of Daffodil Delight I also taped directly to the back of the moon, but in hindsight, I should have taped it to the card base, to give the moon some depth as well.  The little pumpkin in front is popped up, while the larger one in back is taped flat.


Here is the inside of the card, with the third pumpkin in the set, plus a couple of the cute leaves.

You'll notice the ghost's eyes are the same as this pumpkin's, but not the mouth.  The pumpkin has the mouth from the stamp.  For the ghost, I covered the mouth with some scotch tape when stamping, to get only the eyes.  I then drew on the mouth with my Stamp & Write marker, drawing a little oval, and then giving the mouth corners at the top to make the ghost smile sweetly.

The BOOOO is from last year's Googly Ghouls stamp set.  I used Versamark and embossed it in white.  The Happy Halloween is from September's Paper Pumpkin, but if you didn't get it, there are several cute possibilities in the store.