Wednesday, March 11, 2015

Mojo Monday

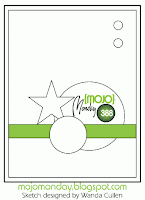
Mojo Monday challenge 388--a fun little sketch.  The star somehow made me think of "a tall ship, and a star to steer her by..." and then I left the star off of my card, 'cause that's how I roll.
https://blogger.googleusercontent.com/img/b/R29vZ2xl/AVvXsEhZ2CZuIdVgxnLeOHaNQyk2h3SU9KeXR8mJoRDoKjNgs3gaT1ZoBORQjKr6lHsHyaU3IkS3zj4N6Fet8_JjNZcoq1oa-GZYYC3-yg-fUAK5fSrGY8HUqIdcrUikRb3pGFOfnMc1yS1k0nGF/s1600/mojo388.gif
 I love this saying, from the Adventure Awaits stamp set.  The whole set is very 50s deco, and lots of fun.  This is perhaps not the best way to highlight a stamp that wants to be done in juke-box colors, but I like the overall card.  The ship is from "The Open Sea."

Here is a Clean-and-Simple version, no sentiment. 
 I loved the lonely look to this, but I kind of felt that it wanted a couple of seagulls.  So I put them in, and immediately regretted making them so big and so stark.  Should've used my gray marker, and a much less curvy wing, to make them look more real against the cloudy sky.

I should probably file this under "mistakes that bug the card maker and are hardly noticed by anyone else," but I know that this is such an egregious error, that you can't possibly overlook it.  Can you?


Supplies list: (shop here)
Stamp Sets:  Adventure Awaits, The Open Sea
Card Stock:  Whisper White, Smokey Slate, Basic Gray, Soft Sky, Lost Lagoon
Ink:  Memento for the stamps; Soft Sky, Lost Lagoon, Smokey Slate, Basic Gray for spongeing.
Accessories:  Scallop Border Edge Punch and a Basic Grey marker for your optional seagulls.  
All the Usual:  Snail tape, dimensionals (for the top card only) sponges (for the bottom cards only.)

Hints and Tips:
On the bottom card, tear a strip of Soft Sky card stock, and only sponge the torn edge very lightly to get the look of foamy brine.  This section is sponged in Soft Sky and Lost Lagoon.
The sky is sponged in Smokey Slate and Basic Grey, with a touch of Lost Lagoon to make the sky look stormier.  When doing the sky, go lightly--try not to saturate your sponge. Wipe of excess ink on scrap paper before rubbing on your card, to get a mistier look.  Try a combination of stippling (patting) and rubbing.
  
Oh, and make your seagulls smaller than mine.


Playing With Color Palettes

I found a gorgeous card on line made with retired stamps and ribbons, so I decided to update it.

But before you look at the card, look at the color palette:
Daffodil Delight, Bermuda Bay, Old Olive, Calypso Coral        So Saffron, Coastal Cabana, Pear Pizzazz, Crisp Cantaloupe

Two variations of the same colors, one more saturated than the other. 
I started with the Blended Bloom image on Whisper white Cardstock, and punched out each quarterof the image with my postage stamp punch. I colored each quarter with a different set of colors, as listed above.  To get this effect, use either your Blendabilities (if you were lucky enough to get a set,) or use your ink pads and aqua painters, or markers and blender pens. 


I cut two sets of squares using my 1 3/8" punch, one in the darker palette, one in the lighter, just to compare.  To me, the darker squares in coral and teal brought out the shadows in the flowers, making it appear almost like a water lily half submerged, whereas the lighter squares made the flowers look more bright. 

I found the opposite effect in the yellow and green.  Strange.  I was thinking that I liked the darker palette better, when it occurred to me that I was not restricted to either or!! It's my card, after all.  


I ended up choosing the darker shades for the warm colors, and the lighter shades for the cool. 


The final result?
Ink pads:  Daffodil Delight, Coastal Cabana, Pear Pizzazz, and Calypso Coral  (Stazon for the image.)
Paper:  Whisper White, then Pear Pizzazz, Calypso Coral 
Stamps:  Blended Bloom, Crazy About You
Ribbon:  Sale-a-Bration Coastal Cabana 1/4" ribbon
Punches:  Large Oval Punch, Scallop Oval Punch
Shop Here

Bordering Blooms

A very pretty, very quick card.

Rich Razzleberry card stock & ink,
Itty Bitty Punch Pack,
Pearl Basic Jewels,
Whisper White card stock,
Snail tape and Glue Dots. 

Oh, and if you use the clear mount stamps, don't forget your acrylic blocks.

Bordering Blooms for the vine,
Blooms of Hope for the sentiment.

Easy-breezy!

Team Challenge--Black and White

Having received yet another little envelope with bits and pieces, I was happy to get my black-and-white card making on.  To tell the truth, I have admired many black-and-white cards, but I don't believe I have ever succeeded in making one.  Starting out with the best intentions to remain sleek and classy, I somehow always end up going technicolor all over it.  However, having received several pieces of the new "Back to Black" Designer Series Paper along with some of the gorgeous silver 5/8" satin ribbon, I was determined try again.  JUST black and white.  Ok, with just a tiny pop of color.

I saw the paper with the little raindrops and immediately thought "April showers bring May flowers."

And I have the perfect little flowers in need of some rain...


Step one, cut out a window using the Labels Collection Framelits.  Put on your ribbon, tie a nice bow, but hold off from taping onto the Whisper White card base 'til after your stamping is done.  Just mark with a pencil where exactly your frame will be on the card, so you can center your words.  

The sentiment is from the fabulously versatile "Crazy About You" set, stamped in Rich Razzleberry.

I used three stamps from the "Sheltering Tree" set to make the grassy hill and flowers.  (Did you know that the little grass blades line up perfectly with the six little blobs to make cute little flowers?)

On a Whisper White card base, make your hillside.  The grass is in Wild Wasabi.  Stamp off once to get the hill lighter, and stamp the little stems full strength.   I used Rich Razzleberry ink for the flowers, but stamped twice each time before inking up again, to get light and dark blossoms.  

Once your stamping is done, erase your pencil marks and tape the designer paper onto the card base.

My second card is here.  I just love the little "chicken feet" pattern.  Okay, it looks more like tulips, but it'll always be cute little chicken feet to me.  Step, peck, step, peck.  Silly.

Same set of Labels framelits, but this time I used two consecutive sizes.

Best way to line up the frames:  
Cut your DSP to 3-3/4" x 5", and a piece of Basic Black to 3-7/8" x 5-1/8".   Cut the label frame out of the center of the DSP with your Big Shot first.  Then, tape the DSP on top of your black.  Now, taking the framelit one size smaller, center it on your layered paper, and run through the Big Shot again.  

The flower, leaves and sentiment are from the "Bloom With Hope" stamp set.  Again, before you tape the DSP to the card base, just mark where your window is.  The sentiment is not centered in the window, but pushed up towards the northeast.  Stamp your leaves in Stazon and color with Old Olive and Pear Pizzazz markers.  Erase your pencil marks, and tape the layers onto the base.

The flower is stamped on scrap paper and colored in Melon Mambo*.  Use water color paper with your Aqua Painters or Blending Pens to get a watercolor effect, if you like. After fussy cutting the flower, I decided to give it a more distinct shadow at the back, so I layered it onto a scrap of black, and fussy cut a thin outline on the southwest half of the flower.  The flower is popped up on dimensionals at the front, but because of the added layers, I only used some glue dots at the back to give it a more level height. 

Click on any product name to go directly to the store, where you can get detailed info and purchase these and all the Stampin' Up! products.  All images are (c) Stampin' Up!

* I used my Blendabilities, but as they have sadly been discontinued, if you don't have them, the same effect can be had with Melon Mambo/Strawberry Slush/Pink Pirouette and a blender pen, or by watercoloring with just Melon Mambo.

Sunday, March 8, 2015

Crazy About Blossoms

Monochrome gives a peaceful look to a card.  Here is a pretty card using just two stamps, and a little embossing powder or glitter. 
 

The flower is from "Crazy About You" stamp set, and the leaf on the card base is the pretty, and very useful fern from "Butterfly Basics."

How to:
Start with a card base of Marina Mist card stock.
Stamp the leaf all over the base, making sure to have most of the image right around the edges. 
I used Versamark, but Marina Mist ink will give you the same look, or perhaps a little softer.

Cut your Whisper White cardstock to 3-3/4" x 5".
Stamp the zinnia with Pool Party ink.  Stamp in the corner, and then without re-inking, stamp again on another area of the card.  Do the same in the opposite corner.  Stamp a third zinnia on a piece of scrap Whisper White and punch out with the Flower Medallion punch.

Use a thin line of Dazzling Details, or Crystal Effects adhesive with Dazzling Diamonds glitter to add glitter to just the edges of the 3 dark zinnias.  Or, if you have a Versamark pen, trace around the flowers, sprinkle with Iridescent Ice Embossing Powder, and heat with your heating tool. Any of the three methods will work.

Tape the white panel onto the card base before proceding further.

Cut two lengths of the 5/8" Organza Whisper White ribbon, and criss-cross diagonally across the center of the card.  I snail-taped the top ends flat, but gave a little wave to the bottom ends by using a couple of glue dots to stick them to the card.

Stick the center flower onto the card with dimentionals, and add your pearls. 


Supplies ListShop Here
Card Stock:  Marina Mist, Whisper White
Ink:  Versamark, Pool Party, Marina Mist
Stamp Sets:  Butterfly Basics, Crazy About You.  Both are available in wood mount, clear mount and polymer.  Crazy About You is still available in a bundle with a fabulous thinlits set called "Hello You."  Look under "bundles" in the on-line catalog to get the discount.
Accessories:  Dazzling Details, or Crystal Effects Adhesive and Dazzling Diamonds glitter, Pearl Basic Jewels, Organza Ribbon
All The Usual:  Snail Tape, Glue Dots, and don't forget your acrylic blocks if you're using polymer or clear mount stamps.