Thursday, February 26, 2015

Happy Easter

I know it's rather early, but I am looking forward to Easter.  Can it really be 14 years since I last made Pisanki? Seems impossible.

Pisanki (singular pisanka) are an art form dating to before Christianity came to Europe.  Originally used to in pagan celebrations to bless fields and livestock with fertility in the spring, the symbols used in the designs took on new meaning as people used them to tell the story of Jesus Christ and the resurrection. 

The cross, telling of Christ's sacrifice for sinners, is of course the central theme of Easter.  We celebrate His triumph over sin and death.

The cross-hatch pattern indicated a fishing net, commemorating the disciples who were fishermen, and the promise that Jesus made, to make them "fishers of men."


I love using lilies on the eggs:  "Consider the lilies of the field, how they grow: they neither toil nor spin, yet I tell you, even Solomon in all his glory was not arrayed like one of these. But if God so clothes the grass, which is here today, and tomorrow is thrown into the fire, will he not much more clothe you, O you of little faith? Therefore do not be anxious, saying, ‘What shall we eat?’ or ‘What shall we drink?’ or ‘What shall we wear?’ For the pagans run after all these things, and your heavenly Father knows that you need them. But seek first the kingdom of God and his righteousness, and all these things will be given to you as well." (Matthew 6:28-33)

Another prominent theme on pisanki is the star of Bethlehem.  Quilters will recognize a typical star pattern, which looks like the lower of the two cards pictured here.  Here are a few variations on two different eggs.
This is one of my favorites, with its cheerful patches of bright red.  The little yellow dots and tear-shapes represent seeds. There are many biblical references to wheat (the Bread of Life) and seeds (wheat and tares, the mustard seed, etc.) In the parable of the wheat and tares, Jesus compares himself to the sower, and the wheat seeds represent the people of God.

The little "fringe" around the design can be seen as rake marks.  In pagan times, a rake or rake marks would simply represent fertility in the soil; however, in the Christian era, we think of the parable of the four soils:  the hard packed soil in which the word of God (the good seed) can not grow, the rocky soil in which it springs up quickly and soon withers for lack of root, the weedy patch where it is choked by cares of the world, and finally, the good soil where it grows deep and produces much fruit.

The curly-queues represent either a shepherd's staff ("Thy rod and thy staff, they comfort me") or they can symbolize ram's horns, representing Jesus as the Lamb of God.

Here are two more variations of the Star of Bethlehem, together with bands of lilies.

Wavy lines in blue would represent water--the crossing of the Red Sea, or the waters of baptism, or occasionally in modern times, the separations of families where the younger generation crossed the Atlantic for a new life in America.  However, in red, yellow or orange, the same lines can represent the fire of the Holy Spirit, given to the disciples at Pentecost, and to all believers upon their conversion.


Below, three views of the same egg.  This one shows barley seed, flowers (representing the beauty of God's creation,) and rams horns.


This little egg was fun to do--it was almost spherical, so I gave it a pattern well suited to such a round egg.  The little red chicken feet, in pagan times would represent---a chicken.  Who would've guessed?  It's pretty much the same now.  So here on this egg, you can see many of the symbols described above, as well as others.
Triangles are for the Trinity--Father, Son, and Holy Spirit.
The band in the second picture, or any line going all the way around the egg, represents eternity.

The egg itself, represents the tomb of Christ.  When you make a pisanka, the final step is to puncture the eggshell and blow or pump out the raw egg, leaving the shell empty.  Just so, when Jesus' friends came to the tomb to change the linens on his body on Sunday morning, they found the tomb empty, for He had risen.

Alleluja!  Happy Easter to one and all. 

Tuesday, February 24, 2015

Details, Details (or, "Lots of Lovely Lemons")

I have met many women who admire a particular craft, but when invited to try it, very quickly and surely say that they are simply not creative/no good at that sort of thing/couldn't possibly etc. etc. etc.  When one is persuaded to sit down and try, I can often see real anxiety--sometimes blushing, often a tightness of breath.  If this sounds like you, I want to offer you what I offer to them:  please don't worry.  This is fun, and you'll find that you really can do it. So take a deep breath, relax, and read on.

Here is the secret.  

It's kind of opposite what a really good dancer does:  they are able to make a dance that looks effortless, but is only possible after a decade of drilling difficult technique. We, on the other hand, like to make crafts that are fun and effortless because they actually are easy, but still make you go "wow." Shameless, I know. But nothing here is difficult.  Just stuff we all learned in kindergarten: cut, color, paste. Lots of easy steps together add up to a card that is very impressive and may look hard, but isn't. 

So here is an example of a series of cards, at different levels of apparent difficulty.  The truth is that no card is harder than the next, it's just a matter of how many steps it took to get each one.
(Scroll down for complete supplies list.)


Clean and simple, the first card involves masking and coloring. The lemon is stamped three times to get a bunch.

You could the card even simpler by having only one lemon and omitting the masking, or stamping on a Whisper White card base, with no other layers.


 Here are the steps for doing the triple image:


1. Stamp the lemon image onto your Whisper White card stock.  (This one is cut to 5" x 3-3/4".)


 2. Stamp again onto a stack of sticky notes. Use the end where they are stuck together.  Peel off the top two, and fussy cut the image from both layers at the same time.  Place one sticky note mask over the image on your card stock.


 3.  Stamp a second lemon above the first, going over the mask.  This lemon will appear to be behind the first one.  Place the second mask over the second image, and then stamp the third, bottom lemon. 

Here's what it will look like.                  Color with the Daffodil Delight and Old Olive Blendabilities:


Voila!  Now just stamp your sentiment, and layer onto the green card stock, and you're done. 

 
OR, for a little more fun, let's add some candy stripes.

Cut a piece of the striped
Irresistibly Yours DSP to 5-3/8" x 4-1/8". 

Using a sponge dauber, color with Daffodil Delight ink to reveal the stripes.  Don't forget to wipe off any excess ink with a paper towel.  Cut the center panel to 4-7/8" x 3-5/8".


Layer onto your green card stock and tape together with snail tape.   All done!  Or are you.....?


For even a little more definition, you may like to set off the lemons with more green.  Just cut the center panel another 1/8" smaller, (4-3/4" x 3-1/2") and layer onto a green card measuring 4-7/8" x 3-5/8".


Beautiful!
Better not mess with perfection.  Unless.....


Like putting on the perfect earrings to go with that little black dress, I thought a little pop of color would be nice.  Enter the 1/4" Calypso Coral ribbon, a Sale-a-Bration freebie!

Fabulous.  I'm very happy now.

But wait!
I really wanted to do this card for the Monday Mojo challenge.  So, for one more fun variation, click here. 

Supplies List:
SALE-A-BRATION items:
Sale-a-Bration ends March 31st, so hurry!  SAB items are available only as a free gift with each $50 purchase. 
the lovely lemon is from "A Happy Thing"  woodmount 139131 or clearmount 139134,
Irresistible Yours Designer Series Paper (the stripes) is item 138635 in the SAB catalog.the Just Be
Ribbon: 138634 (a fabulous accessory pack--comes with 3 different ribbons, and matching buttons.)

Catalog Items:  
Happy sentiment is from "Crazy About You."
There are six options for this set, including three bundles.  I bought the Polymer bundle, 'cause I love a bargain!
 Crazy about You Photopolymer Bundle by Stampin' Up!
Paper:                                                                                    
Garden Green 8-1/2 x 11 Card Stock Whisper White 8-1/2 x 11 Card StockMedium Whisper White Envelopes
          102584                      100730                  107301

 and don't forget:
SNAIL Permanent Adhesive         Sponge Daubers by Stampin' Up!

104332 Snail Tape           133773 Sponge Daubers


Mojo Monday #386

More Lovely Lemons!

Mojo Monday sketch # 386:
This is "tall and skinny" week for the Mojo fans.  Here's my card.  I love the lemons--can't seem to stop at just one.

For instructions on how to get the triple lemon image, click here.

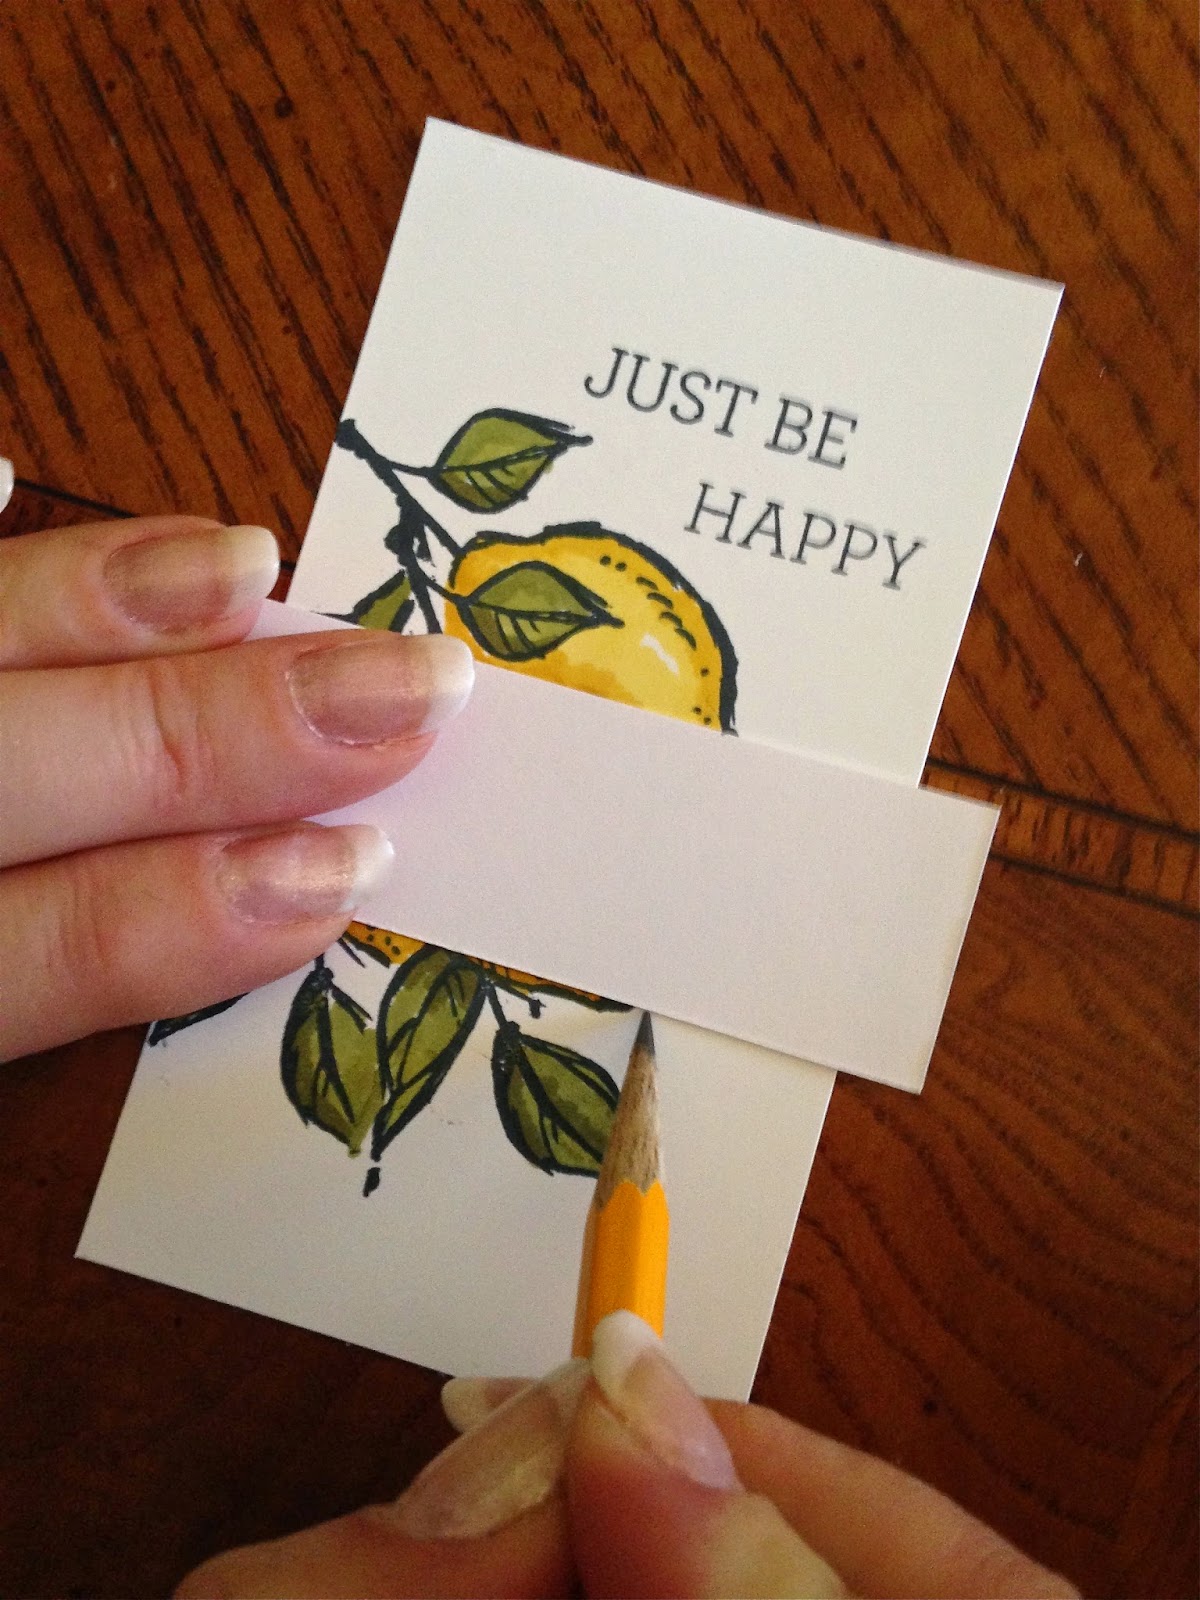
Here's how I slipped the paper strip under the lemons.  A normal person might have simply fussy cut them, but fussy cutting is not really my idea of a good time, so I did it like this:

Here is my stamped image, all colored and ready to go.  I decided on a 1-1/8" band, so I just grabbed a scrap of paper cut to the right width to use as a ruler, and marked where the band would touch the lemon image, top and bottom, both sides.  I went all the way across, but you really only need a little mark in the four places where the image and the band intersect.  (If you do the way I did, please remember to erase all your pencil lines before photographing the card and posting the pictures all over the web.)


 With an craft knife, carefully cut along the outline of the stamped image, between the pencil marks.  Do this on both sides.  Do NOT cut along the marks to the edge of the card. 

Now, just slip the band into the cut you have made, going in one side and out the other.


Trim the band to the length you like.  You can pull it back and forth to play with your layout until you get it just right.  When it's to your liking, Tape everything to the card base with snail tape.